
Caution: Potentially confusing terminology here. Read carefully please. "Toolbox Items" do not always reside in "Toolbox" !
In Visual Studio, the main place where various components originate their way to your project is the Visual Studio Toolbox.
Wherever this documentation refers to Toolbox Items, it needs to be interpreted depending on whether you are working with a Windows Forms or a WPF project, as described below.
If the needed components do not show in the Toolbox: See Troubleshooting the Visual Studio Extension.
|
In runtime, all user interface features (such as controls, dialogs, and live binding; Windows Forms and WPF) and non-visual components are supported both under .NET Framework and .NET 8+. However, "designing" them (this includes tasks like dragging from the Toolbox, or configuring in Properties window) in Visual Studio is only possible in .NET Framework projects. In order to achieve visual design for .NET 8+ projects, the developer can make two project files over the same set of source files, one targeting .NET Framework and one targeting .NET 8+, and use the project that targets .NET Framework for visual design tasks. |
In Windows Forms projects, the Toolbox Items (live binding components) appear right in Visual Studio’s Toolbox under the “QuickOPC” tab:

Note that in Windows Forms, the Toolbox show both visual, and non-visual items.
Note: For the components to be visible in the toolbox, your project needs to be set to target the.NET Framework 4.7.2 or later.
|
WPF design-time features are not available in QuickOPC version 2025.1. This affects the ability to use Visual Studio to configure Live Binding in WPF applications, and to configure properties of QuickOPC WPF controls. You can still use XAML editing to configure properties of QuickOPC WPF controls. QuickOPC version 2025.1 still fully supports WPF in run-time, i.e. the functionality of QuickOPC WPF controls in run-time is not affected, and also existing applications that use WPF Live Binding run correctly. We are evaluating the feasibility of supporting the WPF design-time features in a future version. |
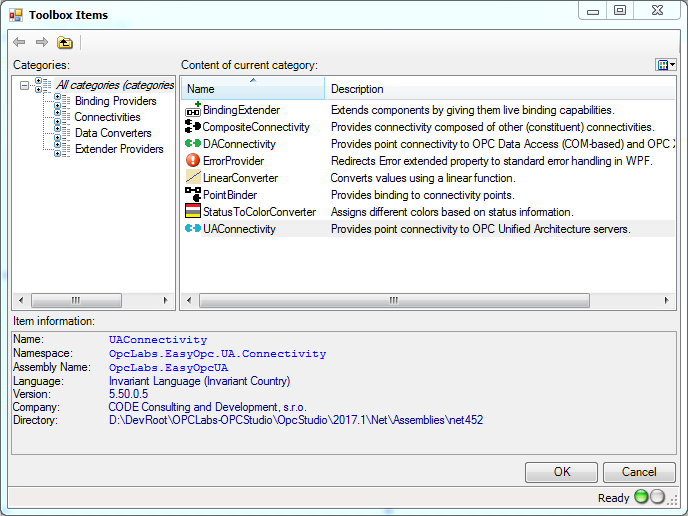
In WPF projects, you need to first invoke the Component Tray dialog in order to work with the items on the component tray. You can then add components from Toolbox Items to the tray by pressing the button. A Toolbox Items dialog will appear:

In order to work with live binding and enable it in your project, you need to place the desired component from the toolbox items to the component tray of your form (container) or window.
Because the PointBinder must always be used with BindingExtender in order to be usable, the toolbox item for the PointBinder uses a special logic, and assures that there is an associated BindingExtender in the container (usually, a form) as well. When you place a PointBinder onto the component tray, we first check whether some BindingExtender already exists in the container, and if so, we configure the newly created binder component to use it (by setting its BindingExtender property). If there is no BindingExtender component on the component tray, we create a new one, and configure the new binder to use it as well.
Similarly, any connectivity component is normally used with the PointBinder. Placing DAConnectivity, UAConnectivity or CompositeConnectivity onto the component tray takes with (or configures) a PointBinder as well.
As a result, in most cases you can simply “forget” about the need to place the BindingExtender or the PointBinder onto the component tray – simply place the connectivity (DAConnectivity, UAConnectivity or CompositeConnectivity) from the toolbox items onto the component tray, and the rest will be taken care of. Just remember that you should not delete the BindingExtender or the PointBinder from your form (window), even though you have not explicitly placed it there.